





Solar Pv Metal Roof Installation System
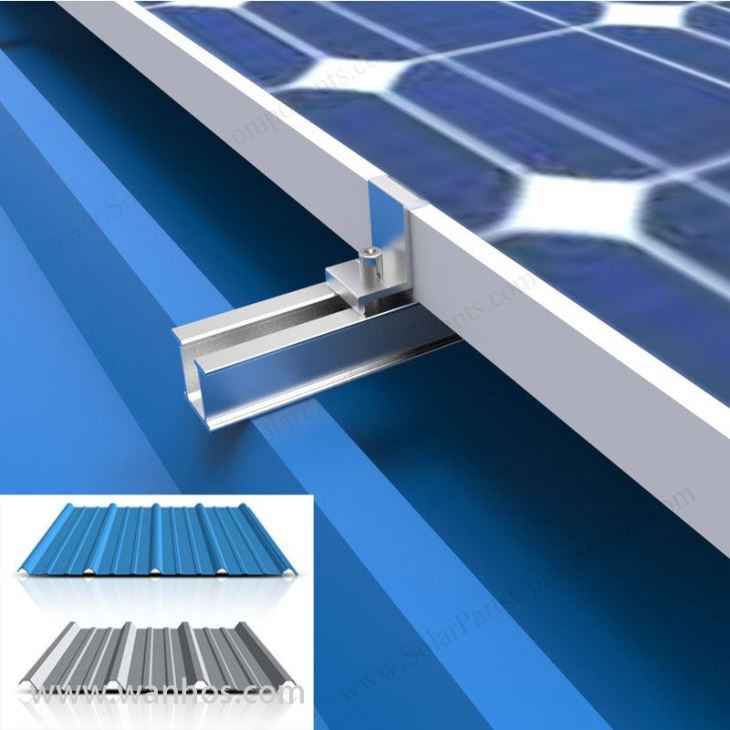
WANHOS solar PV metal roof mounting systems use profile-specific clamps, rails and brackets for standing seam, trapezoidal and corrugated roofs.
Description
Profile-Specific Rooftop Solar Mounting
Solar PV Metal Roof Mounting System
A project-specific mounting solution for installing framed or approved frameless photovoltaic modules on compatible pitched metal roofs. Roof clamps, brackets, rails, module clamps and fasteners are selected according to the exact roof profile, supporting structure, module layout, design loads and waterproofing requirements.

Roof Selection
Profile-Specific Fixing
System Options
Rail-Based or Direct
Reference Materials
AL6005-T5 + SUS304
Applications
Commercial & Industrial
Product Overview
One Product Family, Different Roof Attachments
WANHOS metal roof solar mounting systems connect PV modules to compatible standing seam, concealed-fix, trapezoidal, corrugated and selected insulated metal roof systems. The attachment method changes with the roof: a standing seam may accept a non-penetrating clamp, while an exposed-fastened profile normally requires a purpose-designed penetrative bracket and sealing arrangement.
"Tin roof" is a broad commercial search term rather than a complete technical description. Before selecting any clamp or bracket, identify the roof manufacturer, panel model, rib or seam geometry, metal type and thickness, supporting purlins, roof condition and warranty requirements.
Critical Selection Rule
There Is No Universal Metal Roof Solar Bracket
Standing seams, round seams, clip-lock profiles, trapezoidal ribs, corrugated sheets and insulated sandwich panels transfer loads differently. A bracket that fits visually may still have the wrong bearing surface, fastener location, waterproofing detail or tested capacity. Send the exact roof profile before ordering.
Roof Type Selection
Match the Attachment to the Roof Profile
01
Standing Seam Roof
Use a profile-matched seam clamp intended to grip without drilling through the roof sheet. Clamp fit, set-screw type, torque, spacing and clamp-to-seam capacity must be confirmed.
02
Concealed-Fix / Clip-Lock
Select a clamp made for the exact rib geometry. Check panel clip positions and thermal movement so the PV attachment does not unintentionally restrain the roof.
03
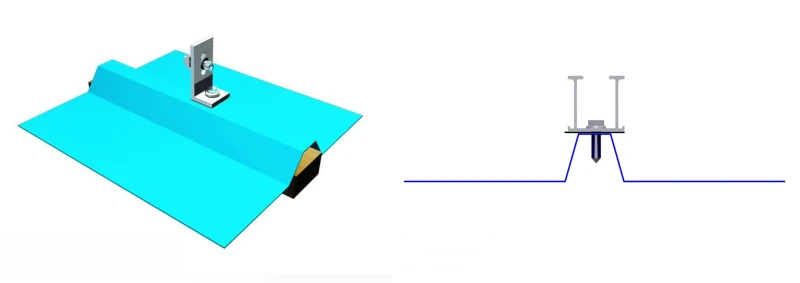
Trapezoidal / Ribbed Sheet
Use an L-foot, mini rail or rib bracket with approved fasteners and factory-specified sealing. Confirm whether loads are carried by the sheet or must reach the purlin beneath it.
04
Corrugated Metal Sheet
The bracket base must match the corrugation and use an approved penetrative fastening and sealing method. Flat brackets must not be forced onto curved crowns.
05
Insulated Sandwich Panel
Use only a mounting solution approved for the exact panel system. The outer skin alone must not be assumed capable of carrying solar loads without panel-manufacturer data.
06
Curved or Special Profile
Request the roof drawing and a project-specific interface. Curvature, nonstandard ribs or fragile sheets may require a custom bracket and connection testing.

System Advantages
Designed for Efficient Installation and Verifiable Performance
Profile-Specific Interfaces
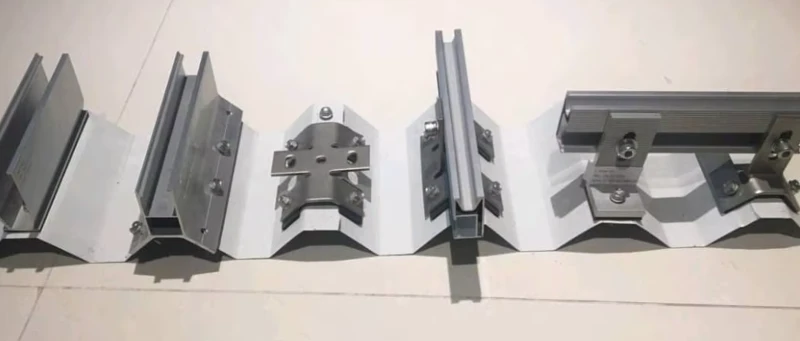
A range of seam clamps, L-feet, mini rails and profile brackets supports different metal roof attachment strategies after compatibility review.
Factory-Prepared Components
Preassembled hardware and cut-to-plan rails can reduce work at height when delivered according to the approved bill of materials.
Portrait or Landscape Layout
Rail direction and support spacing can be designed for either orientation after checking module clamp zones and roof attachment positions.
Engineering Documentation
Project review can define attachment spacing, fasteners, torque, sealing details, rail spans and the required load or pull-out evidence.

Rail-Based vs. Rail-Less
Choose the Module Interface After the Roof Attachment
Rail-Based System
Rails bridge between roof attachment points.
Supports more adjustment for roof spacing and module layout.
Requires rail spans, splices and thermal expansion to be designed.
May provide more space for cable management and MLPE equipment.
Rail-Less / Direct-Attach
Connects modules closer to approved roof clamps or brackets.
Can reduce component count, weight and freight.
Roof seam/rib spacing must align with module support requirements.
Requires careful module compatibility, bonding and cable planning.
Neither method is universally better. Compare roof geometry, module dimensions, structural loads, installation access, drainage, electrical equipment, maintenance and total delivered cost.
System Components
A Complete Metal Roof PV Mounting Assembly
Roof Attachments
Standing seam clamps, concealed-fix clamps, L-feet, mini rails or profile brackets selected for the exact roof.
Roof Fasteners
Model-specific self-drilling or structural fasteners, washers and sealing elements for penetrative attachments.
Mounting Rails
Aluminum rail profiles, connectors and end caps sized for project spans, deflection and thermal movement.
Module Clamps
Mid and end clamps matched to framed module height, or dedicated lined clamps for approved frameless modules.
Rail Splices
Structural connectors installed at approved positions with required gaps or movement provisions.
Bonding & Grounding
Listed or otherwise approved bonding components coordinated with the project electrical design.
Cable Management
Clips, trays or supports that keep PV cables off sharp roof edges, drainage paths and hot roof surfaces.
Technical Data
Reference Specifications to Confirm per Project
Product Type
Rail-based or approved rail-less solar PV metal roof mounting system
Suitable Roofs
Compatible pitched metal roof profiles after roof identification and attachment validation
Module Compatibility
Approved framed or frameless modules after dimensions, clamp zones, load, grounding and warranty review
Module Orientation
Portrait or landscape according to the approved rail and attachment layout
Module Tilt
Normally follows the roof pitch; additional tilt requires a separately engineered elevated rack
Reference Materials
AL6005-T5 aluminum and SUS304 stainless hardware, with galvanized steel only where stated in the final bill of materials
Surface Protection
Anodized aluminum, stainless steel and/or specified galvanized steel; roof-material compatibility must be checked
Attachment Spacing
Calculated from roof zones, wind and snow actions, rail span, bracket/clamp capacity and roof/support capacity
Connection Capacity
Model- and roof-specific test or engineering data; no universal wind/snow rating
Design References
AS/NZS 1170, Eurocodes, ASCE 7 or other specified local requirements only where included in the approved project scope
Warranty
10 years subject to confirmed components, written terms, environment, storage, approved installation and maintenance
OEM & ODM
Available after roof/profile review, drawing, tooling, testing, quantity and commercial confirmation
Standards note: TÜV is an organization that may issue testing or certification; it is not itself a structural design standard. Confirm the exact certificate, covered components, test basis and current validity before citing it in a project submission.
Engineering Review
Verify the Complete Load Path to the Building Structure
Roof Condition
Check corrosion, loose fasteners, damaged coatings, leaks, panel deformation and remaining roof service life before adding PV.
Wind and Snow
Determine actions from the governing code, building height, exposure, topography, roof zones, module geometry and load combinations.
Roof Attachment
Verify seam-clamp test data or fastener pull-out/pull-over capacity for the actual roof material, thickness and support.
Roof-to-Purlin Connection
Check existing panel fasteners, concealed clips and purlins because the solar load ultimately continues into the building structure.
Rail and Module
Check rail span, splice locations, deflection, thermal expansion, module clamp zones, overhang and fastener torque.
Building Capacity
Confirm roof dead load, uplift path, purlins, frames, bracing and local structural approval for the added PV system.
Waterproofing & Roof Warranty
Choose the Right Weatherproofing Strategy for the Roof Type
Standing seam and compatible concealed-fix roofs should normally use a non-penetrating profile clamp so the weathering sheet is not drilled. Exposed-fastened roofs require penetrations, so bracket position, fastener type, sealing washer/gasket, compression and installation quality are critical.
Do not rely on unspecified field sealant as the entire waterproofing strategy. Avoid placing new holes in drainage valleys, damaged sheets or locations that cannot be inspected and maintained.
Roof warranty retention is not automatic. Obtain written approval from the roof-system manufacturer or warranty provider, particularly for new, insulated or still-warranted roofs.
Installation Workflow
From Roof Survey to Final Inspection
1. Identify the Roof
Record manufacturer, panel model, profile dimensions, material, thickness, roof pitch, support spacing and warranty status.
2. Complete the Design
Approve module layout, roof zones, attachment type and spacing, rails, fasteners, sealing, loads and structural verification.
3. Set Out Attachments
Locate seams, ribs, purlins, roof clips and no-drill zones. Keep attachments aligned and out of drainage paths.
4. Install Clamps or Brackets
Use the exact fasteners, gaskets and model torque. Confirm full seating, correct engagement and controlled sealing compression.
5. Fit Rails and Modules
Control rail alignment, splice gaps, module clamp zones, torque, cable support, bonding and maintenance clearance.
6. Inspect and Record
Check penetrations, sealing, torque marks, coating damage, drainage, cable routing and as-built deviations before handover.
Information Required
What to Send for an Accurate Mounting Proposal
✓ Roof manufacturer, panel system and profile name
✓ Clear roof photographs and dimensioned profile drawing
✓ Seam/rib width, height, pitch and spacing
✓ Roof sheet material, thickness and surface coating
✓ Purlin type, material, thickness, spacing and drawings
✓ Roof pitch, condition, age and warranty status
✓ Building height, dimensions and project location
✓ Design wind, snow, seismic and corrosion environment
✓ Module brand, model, datasheet and quantity
✓ Portrait/landscape layout and proposed array plan
✓ Required codes, certificates and approval documents
✓ Quantity, packaging, delivery schedule and destination port
Quality Documentation
Documents to Confirm Before Production
✓ Approved array and roof attachment drawings
✓ Structural calculation scope and assumptions
✓ Roof-clamp or fastener load/capacity evidence
✓ Final bill of materials and component drawings
✓ Material and coating certificates
✓ Fastener, clamp and module torque schedule
✓ Waterproofing details and installation manual
✓ Packing list, pallet marks and traceability plan

Frequently Asked Questions
Solar PV Metal Roof Mounting FAQ
What is a solar PV metal roof mounting system?
It is the complete mechanical assembly that connects PV modules to a compatible metal roof using profile-specific clamps or brackets, rails/direct attachments, module clamps, fasteners, bonding and sealing components.
Which metal roof profiles are supported?
Standing seam, concealed-fix, trapezoidal, corrugated and selected insulated profiles may be supported, but each requires a compatible attachment and verified roof data.
Can one bracket fit every metal roof?
No. Seam shape, rib dimensions, sheet thickness, material, coating and supporting structure differ. Select the bracket from the exact roof profile rather than appearance alone.
Does installation require drilling?
Compatible standing seam and concealed-fix clamps are generally non-penetrating. Trapezoidal, corrugated and exposed-fastened roofs normally use penetrative brackets or mini rails with approved sealing.
Should fasteners attach only to the roof sheet or to the purlin?
That depends on the tested/engineered bracket and roof system. Some approved systems load the profile sheet; others must connect into purlins. Never assume the outer sheet alone is sufficient.
How are roof penetrations waterproofed?
Use the bracket's specified gasket or sealing washer, correct fastener and controlled compression at approved roof locations. Follow the roof and bracket manufacturers' instructions rather than relying on generic sealant.
How is attachment spacing determined?
Spacing is calculated from wind and snow actions, roof zones, rail span, clamp/bracket capacity, fastener capacity and the metal roof, purlins and building structure.
Is 60 m/s a universal wind rating?
No. Wind speed is only one design input. Building height, terrain/exposure, topography, roof zones, module layout and the governing code determine the actual connection forces.
Does the system provide a 10–60° module tilt?
Standard metal roof systems normally follow the existing roof pitch. Raising modules to another angle requires a separately engineered tilt frame because it changes wind loads and attachment reactions.
Can modules be installed in portrait and landscape?
Both may be possible after coordinating rail direction, roof attachment positions, module clamp zones, allowable overhangs and the structural calculation.
Can frameless glass modules use the same clamps?
No. Frameless modules require dedicated lined glass clamps approved for the exact glass thickness, edge clearance, orientation and clamp force. Standard framed-module clamps must not contact bare glass.
Can solar be mounted on insulated sandwich panels?
Only with a system approved for the exact panel and support construction. Confirm panel-manufacturer instructions, fastener positions, load data, sealing and warranty before installation.
Will installing solar preserve the roof warranty?
Not automatically. The roof manufacturer or warranty provider should review the mounting, penetrations, loads, thermal movement and installation process and confirm acceptance in writing.
Rail-based or rail-less: which is better?
Rail-less can reduce parts and weight, while rails provide more layout adjustment and space for services. The better choice depends on roof spacing, modules, loads, cable management and total project cost.
What is required for an accurate quotation?
Send roof/profile drawings and photos, sheet/purlin data, building dimensions, project location and loads, module datasheet, array layout, warranty requirements, quantity and delivery schedule.
For Project Review
Start with the Roof Profile, Module and Building Structure
Provide the exact roof profile, sheet and purlin data, building dimensions, module layout, design loads, corrosion environment and quantity. WANHOS can then review the suitable clamp or bracket, rail arrangement, attachment spacing, waterproofing details, documentation and export supply plan.
Hot Tags: Solar Pv Metal Roof Installation,Solar Panel Mounting System,Solar Installation,Solar Metal Roof,Solar Metal Roof Installation,Solar Mounting System


