

Aluminum Solar Mounting Structure With L Feet
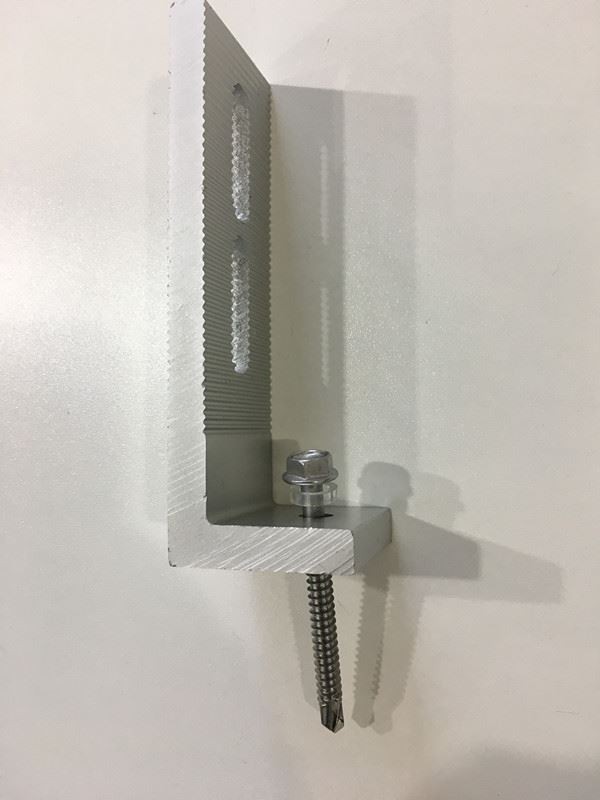
WANHOS Aluminum Solar L Feet provide a secure, adjustable connection between PV mounting rails and the supporting structure beneath compatible trapezoidal and corrugated metal roofs. Manufactured from anodized AL6005-T5 aluminum and paired with stainless steel fasteners and EPDM sealing components, the L-foot kits support efficient rail alignment, project-specific fastening and durable commercial rooftop installation.
Multiple bracket heights, slots, finishes and fastener combinations are available to suit different roof profiles, substrates and rail systems.
Description
SOLAR METAL ROOF ATTACHMENT
Aluminum Solar L-Foot Bracket for Metal Roofs
WANHOS solar L Feet connect aluminum mounting rails to the supporting structure beneath trapezoidal, corrugated and other compatible exposed-fastener metal roofs. Manufactured from AL6005-T5 aluminum and supplied with project-appropriate stainless steel fasteners and EPDM sealing components, the L-foot kit provides a simple, adjustable interface for rail-based PV installations.
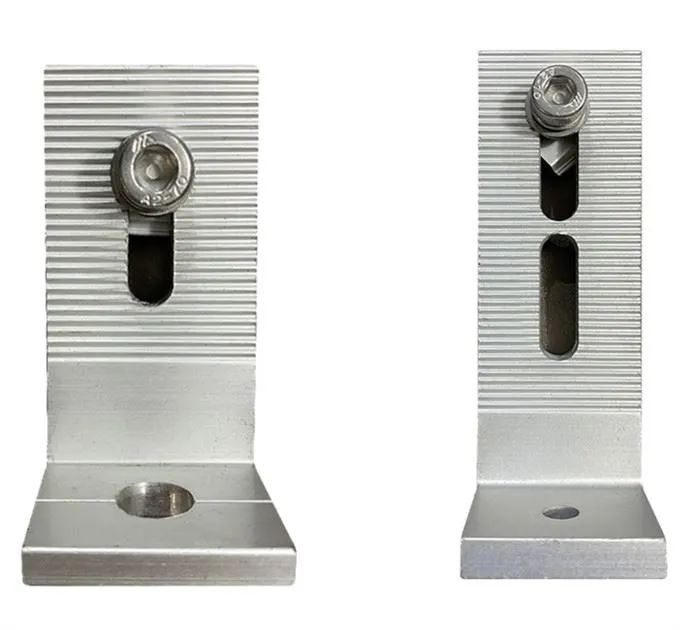
MATERIAL AL6005-T5 / FASTENERS STAINLESS STEEL / SEALING EPDM PAD / FINISH NATURAL OR BLACK
PRODUCT OVERVIEW
A Practical Rail Attachment for Exposed-Fastener Metal Roofs
The L-foot creates a vertical connection point between the roof attachment and the solar mounting rail. Its slotted design helps the installer align and level the rail, while the rail, clamps and splices complete the module-supporting structure. The correct bracket, fastener and sealing method must be selected for the roof profile, structural substrate and project loads.
01 Fast Rail Installation
Pre-assembled rail hardware reduces loose parts and allows rails to be positioned and secured with standard installation tools.
02 Adjustable Rail Alignment
The vertical slot provides installation tolerance for rail height and alignment. The available adjustment range depends on the selected L-foot model.
03 Corrosion-Resistant Materials
Anodized AL6005-T5 aluminum and stainless steel hardware are selected for durable outdoor use. Material compatibility must still be checked for highly corrosive or coastal environments.
04 Project-Specific Fastening
Wood screws, self-drilling screws, hanger bolts or seam clamps may be paired with an L-foot only when they are compatible with the roof structure and approved mounting design.
ROOF COMPATIBILITY
Choose the Attachment by Roof Profile and Substrate
"Metal roof" describes several very different roof systems. A safe selection starts with the panel profile and the material beneath it-not with the L-foot alone.
Trapezoidal and Corrugated Metal Roofs
These are the primary applications for a penetrating L-foot attachment. The bracket is normally positioned on a suitable high point of the roof profile and fastened into a verified purlin, rafter or other approved structural substrate. Bracket base geometry must suit the roof rib.
Wood or Steel Supporting Members
A wood screw or lag screw may be specified for timber, while a compatible self-drilling fastener is generally required for steel. Fastener type, diameter, embedment and edge distance must follow the structural design and substrate specification.
Standing Seam Metal Roofs
Do not fasten a standard L-foot directly through a standing seam. A seam-specific, non-penetrating roof clamp is normally selected first; an L-foot may then connect the approved clamp to a compatible rail when a rail-based system is required.
Hanger-Bolt Configurations
For certain corrugated roof and structural combinations, a hanger bolt can provide the roof-to-rail interface. Thread size, sealing arrangement and substrate engagement must be confirmed for the selected assembly.

ROOF SEALING
How the EPDM Pad Supports a Watertight Installation
The EPDM pad compresses beneath the bracket to help seal the roof penetration and separate the aluminum bracket from the coated metal sheet. It is one element of the complete weatherproofing method; it is not an IP rating or a universal guarantee against leakage.
01 Confirm that the roof sheet, coating and supporting structure are in serviceable condition.
02 Position the attachment away from water channels and in the location required by the approved roof-specific design.
03 Keep the EPDM pad clean, flat and correctly centered beneath the bracket or washer.
04 Tighten fasteners to the specified torque. Under-tightening may not seal; over-tightening may damage the gasket, roof sheet or threads.
05 Use additional flashing or sealant only when required by the roof manufacturer, local code or approved installation instructions.
SYSTEM COMPONENTS
From Roof Attachment to Module Clamp
The L-foot is one part of a complete rail-based mounting system. Final quantities and component models depend on the roof, module layout and engineering calculation.
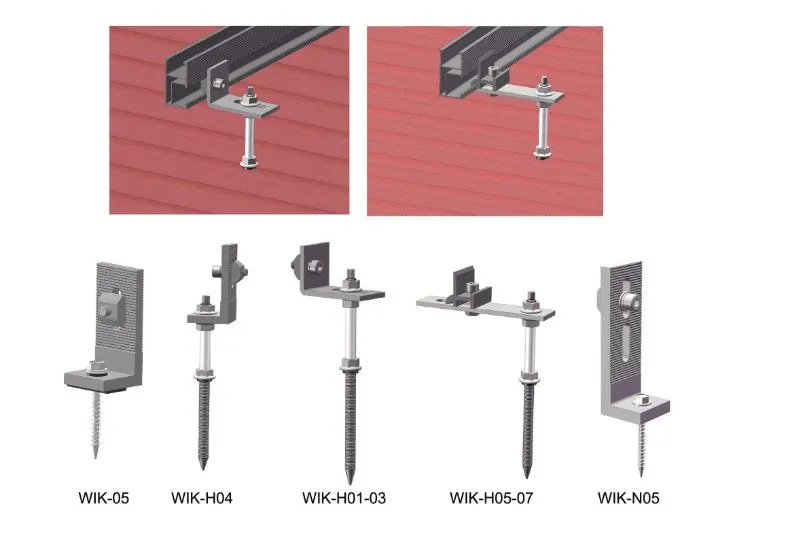
01 L-Foot Bracket - Available in different heights, hole patterns and slot configurations.
02 Roof Fastener - Selected for timber, steel or another approved structural substrate.
03 EPDM Sealing Component - A pad or washer matched to the attachment configuration.
04 Aluminum Rail and Splice - Continuous support and alignment for the PV module rows.
05 Mid and End Clamps - Selected for the module frame height and manufacturer-approved clamp zone.
TECHNICAL AND COMMERCIAL DATA
Product Specifications
The data below describes the standard referenced configuration. Confirm the drawing, fastener, packaging and documentation for the exact model before ordering.
Primary Application: Compatible trapezoidal and corrugated exposed-fastener metal roofs
Bracket Material: AL6005-T5 aluminum
Fastener Material: Stainless steel
Surface Finish: Anodized; natural silver or black options
Standard Referenced Kit: L-foot, M6.3 × 80 mm wood screw and EPDM waterproofing pad
Other Fastener Options: Subject to roof sheet and structural substrate
Warranty: 10 years, subject to the confirmed product and warranty terms
Design Service Life: More than 20 years, subject to environment, design and maintenance
Packaging Reference: 100 sets per inner box; 4 inner boxes per outer carton
Typical Lead Time: Within 15 working days after order confirmation; quantity and customization may affect timing
MOQ: Confirm by L-foot model, fastener combination and packaging requirement
Technical Documents: Request model-specific drawings, test reports and applicable certification documents
Dimensions, loads, fastener capacity and compliance cannot be confirmed from the product name alone. Use the approved project drawing and installation instructions for final construction.
INSTALLATION LOGIC
From Roof Survey to Module Installation
Installation must be completed by qualified personnel in accordance with the structural design, roof manufacturer requirements, local code and component instructions.

STEP 1 Survey the Roof
Identify the roof profile, material condition, structural members, fastener locations, drainage paths and any restricted attachment zones.
STEP 2 Set Out the Attachment Positions
Mark L-foot locations according to the engineered rail span, module clamp zones and verified purlin or rafter positions.
STEP 3 Prepare the Sealing Interface
Clean the contact area and correctly position the specified EPDM pad, gasket, flashing or sealant system.
STEP 4 Fasten the L Feet
Install the approved fastener into the structural substrate and tighten it to the specified torque without damaging the roof or sealing material.
STEP 5 Align and Secure the Rails
Use the L-foot slots to level the rails, connect rail splices where required and complete all connections to the specified torque.
STEP 6 Install and Inspect the Modules
Place clamps within the module manufacturer's approved clamp zones, complete bonding and grounding, and inspect every fastener and roof penetration.
PROJECT REFERENCES
Rail-Based PV Mounting on Metal Roofs
These reference images show completed rooftop applications. The attachment spacing and component combination for a new project must be recalculated rather than copied from a photograph.


INFORMATION REQUIRED FOR SELECTION
What to Provide for an Accurate L-Foot Proposal
Send clear roof photographs and the roof-panel profile drawing, including rib height, crown width and sheet thickness. Also provide the supporting substrate type and thickness, purlin or rafter spacing, module dimensions and quantity, array layout, rail model or channel drawing, site location, wind and snow design requirements, and any roof warranty or waterproofing restrictions.
For component purchasing, also specify the required L-foot height and slot, fastener type, finish, order quantity, destination port, packaging requirement and requested technical documents.
FREQUENTLY ASKED QUESTIONS
Solar L Feet FAQ
What metal roof types are L Feet used on?
Standard penetrating L Feet are primarily used on compatible trapezoidal and corrugated exposed-fastener metal roofs. The bracket base, sealing pad and fastener must match the roof profile and supporting structure.
Can L Feet be installed directly on a standing seam roof?
A standard L-foot should not be screwed through a standing seam. Use a seam-specific non-penetrating clamp approved for the seam profile; an L-foot may connect that clamp to a rail when required by the system design.
Do EPDM pads prevent roof leaks?
EPDM pads help seal penetrations when the correct parts are installed on a clean surface at the specified compression. Watertight performance also depends on attachment location, roof condition, fastener torque, flashing or sealant requirements and workmanship.
Can the L-foot be attached only to the thin roof sheet?
The referenced configuration is intended to transfer loads into a verified purlin, rafter or approved structural substrate beneath the sheet. Sheet-only fastening should be used only when the complete attachment has documented capacity and the project engineer approves it.
How far apart should solar L Feet be installed?
There is no universal spacing. It depends on wind uplift, snow load, rail capacity, roof-support spacing, module layout, attachment capacity and edge or corner zones. Use the project calculation and approved layout.
Does an L-foot create a 5°–60° module tilt?
Not by itself. A standard L-foot supports a rail that generally follows the existing roof pitch. Additional engineered tilt legs or triangular supports are required when the module angle must differ from the roof angle.
How do I confirm rail compatibility?
Provide the rail cross-section, channel dimensions, connection-bolt size and required L-foot slot orientation. Compatibility must be checked mechanically; a similar-looking rail channel is not enough.
Can the kit be customized?
L-foot height, slot position, anodized finish, rail hardware, fastener type, EPDM component and packaging may be configured subject to technical review, tooling and order quantity.
Hot Tags: aluminum solar mounting structure with l feet, suppliers China, manufacturers, factory, customized, buy, price, pricelist, quotation, free sample